PlanGexQ main screen consists of several tabs that display the various types of data stored in a database. These include expression patterns, morphologies, genes, species, and publications. In addition, the search tab allows querying the database for specific information. Clicking on a tab will bring up an alphabetic list of all current items corresponding to that data type in the database. Elements of each data type can be created, copied, or edited from these tabs directly, using the buttons on the bottom of the window. Double clicking an element will automatically bring up the edit screen, where all the details of the element can be viewed and edited.

PlanGexQ can create, open, and modify databases stored in the gdb file format. The following actions are available in the File menu:

A new expression pattern can be created from scratch or copied from an existing expression pattern by clicking on “New” or “Copy” at the bottom of the expression pattern tab in the main window and in the Edit Morphology window. Double-clicking on an expression pattern or selecting “Edit” in the main window or widget edits the expression pattern. During the creation or edition of an expression pattern, the following interface shows the characteristics of the expression pattern:

An expression pattern is divided into its general information, registration, image, and ontological annotations.
The first information to be input in an expression pattern are the name of the morphology, the publication, the gene, and any additional comments that may not have a designated field. The morphology will either be automatically generated if it was created through the morphology form, or the morphology can be selected before the expression pattern is created. The publication and gene can be selected from an existing one using the dropdown menu or a new one can be created by clicking on “New”. An existing publication or gene can also be edited from this screen. See more about genes, their naming conventions, and their links further below on this page.

Images found in publications can be added along with the expression pattern to serve as a guide or source of the registration. Keeping the source of the original expression pattern is encouraged. When adding images, the exact figure and corresponding caption from the publication can be labelled, as well as the assay type or evidence used in the experiment. The caption from the expression pattern can be used for automatically generating relevant gene names and ontology terms.

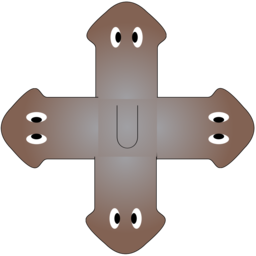
The registration of expression patterns can be made and edited with three tools: the pen tools, the organs, and the color changing tool.
A cartoon of the morphology will automatically be generated by the graph created in the morphology page. You can register with the pen tool on top of the morphology to replicate the expression pattern found in the publication. There is a size slider tool which can vary the size of the pen, as well as an opacity slider tool which can change the opacity of the pen. By clicking the erase tool, the pen can be used to erase parts of the registration. The erase tool is compatible with the opacity slider. If the pattern of the registration is correct but too opaque, the opacity can be as well reduced from the registration with the pen tool.

A set of premade expression patterns for specific organs are included in the program, including: Brain, Eyes, Pharynx, Ventral Nerve Cords, Neoblasts, Digestive system (the entire system as well as each branch), Parenchymal Cells, Anterior Sensory Cells, Auricles, Ovaries, Testis, and Protonephridia. Clicking the button once will add the organ expression to the registration. Clicking it again will erase the organ expression from the registration. The organs are compatible with the opacity tool, so organs can be added (and removed) at varying opacities. Clicking the organ will automatically select the corresponding ontology term.

The color of the registered expression can be changed by clicking the "Select Expression Color" button in the bottom left corner of the page. Clicking this will bring a new form where a desired color can be selected. By clicking the "Pick Screen Color" button, any color found anywhere on the screen can be selected, similarly to the eyedropper tool on image editing tools.
An example can be seen below where the expression color was changed to match the color found in the image from the publication.

Several tools are included in the program to automatically assign appropriate ontological terms to annotate the expression pattern. These tools are detailed below. When finding an appropriate term, the item can be checked and it will be added to a running list of selected terms. By unchecking the item, it will be removed from the Selected Terms list.
Once the expression pattern has been registered, by clicking the "Scan Expression" button, the program will scan the locations of the registration and perform two operations: (1) generate potential ontological terms based on the regions where the expression pattern is registered (head, prepharyngeal region, pharyngeal region, and tail) and (2) calculate the relative amount of expression in each region.
In red it can be found the "Scan Expression" button. In purple it is shown how the checked term is added to the running list of selected terms. In blue and green it is noticed how two spots of equal size but varying opacities result in different relative expression levels.

Once the image(s) and their captions have been added from the publication, by clicking the "Scan Caption" button, the program parses the caption(s) and returns all the terms found in the caption that are also in the planarian ontology. The tool also suggests the gene names it finds in the caption, which may be the gene assayed in the expression pattern, recorded in the general info section of the expression pattern.
In red it is shown the "Scan Caption" button as well as the widget's resulting suggested terms. In green it is shown the program suggested gene it found in the caption. If the gene already exists in the database, by selecting "OK" the program will automatically assign that gene to the expression pattern. If the gene does not exist, it will create a new gene and confirm it in a form to assign the gene external links.

The Planarian Ontology tree can be traversed manually and with the search bar. By clicking the grey arrows on the left, the headings can be expanded and closed. While ontologies are generally graph structures, the program shows them as a tree for easier traversal. When searching a term, the tree will expand to show and highlight all instances of that term found along the ontology tree. Note how checking a term in other widgets will also check the term in the tree (and vice versa). By hovering over a term, the description of that term will appear.

Morphologies are created and edited in the morphology editor, which is divided into two panels. The left panel shows the graphical formalization of the morphology, while the right panel shows a cartoon representation to help with the visualization of the morphology being created.

New morphologies are usually created by copying and editing the wild type morphology. However, new morphologies can be created from scratch also, as it is described next.

The first step of creating a morphology is to define the regions it contains. These include head, neck, trunk, tail, and blastema regions. To add a first region, right click on the left panel and select the desired region under “Create region”:
![]()
Right clicking on an existing region will provide several options:
Add region: adds a new region with a connection to the selected region.

Change type: changes the region type of the selected region.

Result:

Add organ: adds a new organ to the selected region. See below for details.
Delete selection: deletes the selected region. This also deletes any organs in that region.

Result:

Any number of any types of regions may be added to the morphology in any combination. Regions can be moved to the desired place by clicking and dragging the marker in the left panel.
Every region is defined by a number of external boundaries and connection boundaries. A region connected to a single other region will have three external boundaries. A region connected to two or more other regions will have an external boundary between every set of connections. There is one connection boundary defining every pair of connected regions. To adjust either type of boundary, left click and drag the colored circle corresponding to the boundary. External boundaries are defined by red circles, while connection boundaries are defined by green circles. External boundaries define the shape of the region itself. Connection boundaries define where one region stops and the next begins.
Initial morphology:

Adjusting region-region boundary:

Adjusting external boundary:

Organs can be added to the selected region by right clicking the region marker in the left panel and selecting the desired organ type under “Add organ”. Organs include eyes, brain lobes, pharynxes, and ventral nerve cords (VNC). Any organ may be added to any type of region. The wild type worm has two eyes and two brains in the head, a pharynx in the trunk, and two VNC’s in the trunk that span the length of the worm. To delete the selected organ, right click on the organ’s marker in the left panel and choose “delete selection”.
Adding an organ to a region:

Resultant morphology:

Organ markers will only appear when its region has been selected first; however, organ markers can be set always visible by activating the “All parameters” option in the View top menu.
Morphology view with all parameters option off:

Morphology view with all parameters option on:

Eye, brain, and pharynx organs are defined by a location and a rotation. To move the location of an organ, left click and drag its marker to the desired location. To rotate the selected organ, left click and drag the blue circle on the border of the marker.
Displacing and rotating an organ:

Resultant morphology:

A VNC is defined by a curve made of three points. To adjust the location of the curve points, select the organ’s marker, and then click and drag either the marker (the middle point defining the curve) or one of the two olive-color circles connected to the marker (the end points defining the curve).
Adding a VNC:

Adjusting a VNC:

The search tab allows querying the database for searching specific data. A query is constructed with four parameters according to the following format:
The available operators for all the queries are the following:
Example: Search “Morphologies” with “Num. heads” “greater than” “1”. This search returns all morphologies that contain more than one head:

Each data type has specific characteristics that can be used in a query. These include:
Example: Publications with gene equal to "PC2". This would return all publications that have an expression pattern for PC2:

Example: Genes with publications named equal to “The expression of planarian brain factor homologs DjFoxD and DjFoxG”. This would return the genes listed in said publication:

In addition, morphologies can be searched according to the number of the following features: regions, links, heads, trunks, tails, eyes, brain lobes, pharynxes, and nerve cords.
Example: Morphologies with number of heads greater than one:
Also, publications can be searched by either title or year.
Example: Publications from earlier than 2010:

Finally, a quick search can be performed from most tabs. Right clicking on an element will give the option to search for any other parameter with that element as the limiting parameter.
Example: Searching all the genes that are present in a given publication:

Two different genes were curated from "Expression of secreted Wnt pathway components reveals unexpected complexity of the planarian amputation response":

Any names may be used in the database, but several conventions were used when making the central database.
Morphologies names are created as explicit and modular as possible. Morphology names describe sequentially each morphological variation from the wild type. The goal of using a modular approach is to aid in both locating existing entries and adding new entries in an organized fashion. Common traits are always put first in names, so that similar morphologies are in close proximity in alphabetical order.
Genes are named without its species identifier.
Links will automatically be generated as their name are typed. You can use these links to find the gene in alternate databases and submit their IDs in the form. Once submitted, these links will persist and go directly to the page of the ID submitted.

Clicking off the image in either panel in an editor, and then holding ctrl and sliding the mouse wheel will zoom the contents of the screen in or out. Alternatively, when using a laptop pad, zooming can be achieved by holding one finger fixed and sliding a second finger.


Right clicking on the blank area of any image will give the option to export the image as a png, jpg, or bmp file: